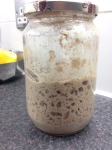
I’ve been making pizza with my own 100% hydration rye sourdough starter with wild yeast from my area for quite some time now. It’s an easy hassle-free recipe which involves very little actual labour from start to finish. What it does require though is lots of patience as it’s a dough based on a protracted second proving stage under refrigeration to retard the proving process which contributes to the fuller, more soury, tang to the dough.
INGREDIENTS
- 500g strong white wheat flour (or 400g 400g strong white wheat flour and 100g fine or medium semolina
- 375g filtered water (do weigh it) at room temperature
- 150g sourdough starter
- 10g/2tsp fine salt
STEPS
- mix the starter well into the water by whisking it with a fork or balloon whisk
- add this mix to a larger bowl in which you’ve put the flour beforehand, stir the mixture with a wooden spoon to the point that all the flour is wet – don’t over-mix – then squelch the dough, cover the bowl with cling film and leave it to rest for 30 minutes for the flour and water to autolyse
- now turn the dough onto an oiled work top, oil well your hands and wrists as the dough it quite wet and sticky, then flatten it out with your fingers – you’ll notice that there’s an enjoyable silk-like texture to the autolysed dough while you’re handling it – sprinkle the flattened out dough with the salt, before folding the dough and lightly kneading it for a minute or so. It really is almost a no-knead recipe. (See e.g., this and this video for more guidance)
- return the dough to the larger bowl, cover the bowl with cling film and leave somewhere warm (but not too warm) to rest for its first prove for c. 90 minutes.
- Turn the dough onto a well-oiled work top, oil your hands and wrists, and start flattening out the dough again. The silkiness and pliability of the dough would have increased by now, and it really is a pleasure to handle it. Now fold and gently knead for another minute or so. (Again, see this video for guidance).
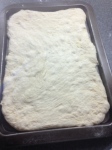
- Pop the dough into an oiled plastic container and cover. Now store this in the fridge for the second prove which should take around max., 48 hours. In that sense, if you want to have pizza on Saturday evening say around 20.00, start working on your dough on Thursday evening around 19.00 or so.
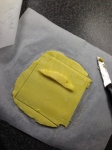
- On pizza baking day (i.e., c. 48 hours after popping the dough in the fridge) turn the dough onto your work top which you’ve heavily dusted with flour and some semolina or polenta (see pics), cut it into three equally sized portions.
- Now flatten and roll each out with your hands to get three 30cm diameter pizza bases.
- Dust your baking trays with coarse semolina or cornmeal/polenta (NB., I prefer cornmeal/polenta), pop your dough disks onto each tray, add your toppings, and bake at the top shelf of a pre-heated oven for about 17-20 minutes at 250C (fan assisted). That’s the highest my oven goes but if you’re lucky enough to have an oven that goes up to 400-500C, or you’re using a wood-fired oven etc., then make sure you keep an eye on it as it’s probably going to be ready within 4-5 minutes or so (and it’ll have beautiful blisters around the crust).
FURTHER INFO
I have mine with a variety of toppings but these are usually: tomato sauce, torn mozzarella, black fleshy/wrinkly olives, smoked ham, and finely sliced chestnut mushrooms – or – tomato sauce, torn mozzarella, fennel salami, finely sliced mushrooms, or whatever other combo is your thing.
I make three different types of tomato sauce: two cooked ones, and a raw one (I don’t use these together – it’s either/or). I spoon the sauce over the base and then spread it all out in a centrifugal way with the belly of a tablespoon or ladle.
- cooked sauce no. 1: this one involves sweating an onion and a couple of garlic cloves with a chopped red chilli, adding a tin of tomatoes, seasoning, and 1/2 tsp of sugar, and a little olive oil, and then simmering on a stove top for about 40 minutes on the lowest setting;
- cooked sauce no. 2: this one involves heating about 50ml of olive oil in a pot till its near smoking point, adding two cartons of passata (2 x 500ml) and stirring to make sure it emulsifies, adding 1 tsp sugar, 1 tsp salt, some cracked pepper and some chilli flakes (say 0.5 tsp of each), turning the heat down to a slow simmer for an hour or so, and adding a bunch of torn fresh basil leaves probably 30 mins before turning off (my favourite). Both cooked sauces last for at least a week in a jar in the fridge;
- My raw revision involves blending together 1/2 tin of tomatoes, 1 garlic clove, 1/2 red chilli, 1 tsp dry basil, 1/3 tsp sugar, seasoning, 1 tbsp tomato paste, a glug of balsamic vinegar, and a 2-3 good glugs of olive oil. I only use this when I’ve ran out of cooked sauce.


-

- sourdough pizza dough after 48 hour prove
-

- bubbling away after 48 hours and a few minutes at room temperature
-

- mise en place
-

- coming up to 48 hours retarded prove
-

- stages – 0 hours, 24 hours, and 28 hours retarded prove
-

- slightly over proved
-

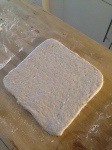
- after 48 hours
-
- before toppings
-

- with toppings
-

- sourdough starter
-

- half quantity after 30 hours prove
-

- strong starter in the dough cracks tapperware :p
-

- ham, leek, mozza version
-

- 48 hour and 0 hour side by side
-

- baked after 18 minutes at 250C fan
-

- side view – aerated and tangy
-

- mushroom, mozza, ham version
-

- close up
-

- turn dough on surface to shape into pizza bases
-

- with sauce
-

- with toppings
-

- baking after 5 minutes at 250C fan
-

- done
-

- unglazed ceramic pizza ‘stone’ I use nowadays to bake on
-

- transferred to the stone albeit not wholly successfully – need more practice
-

- done
-

- ready for eating